Car Keypoints
On this page
Car Keypoints#
This section describes the OpenPifPaf plugin for vehicles. The plugin uses the ApolloCar3D Dataset. For more information, we suggest to check our latest paper:
OpenPifPaf: Composite Fields for Semantic Keypoint Detection and Spatio-Temporal Association
Sven Kreiss, Lorenzo Bertoni, Alexandre Alahi, 2021.
Predict#
Prediction runs as standard openpifpaf predict command, but using the pretrained
model on vehicles. The flag --checkpoint=shufflenetv2k16-apollo-24 will cause
that our 24 keypoint version of the Shufflenet 16 (AP 76.1%) will be automatically
downloaded. As an example, we have tried on an image of the streets of Saint Peterbourg:
%%bash
python -m openpifpaf.predict images/peterbourg.jpg \
  --checkpoint=shufflenetv2k16-apollo-24 -o images \
  --instance-threshold 0.05 --seed-threshold 0.05 \
  --line-width 4 --font-size 0
INFO:__main__:neural network device: cpu (CUDA available: False, count: 0)
WARNING:openpifpaf.decoder.cifcaf:consistency: decreasing keypoint threshold to seed threshold of 0.050000
INFO:openpifpaf.decoder.factory:No specific decoder requested. Using the first one from:
  --decoder=cifcaf:0
  --decoder=posesimilarity:0
Use any of the above arguments to select one or multiple decoders and to suppress this message.
INFO:openpifpaf.predictor:neural network device: cpu (CUDA available: False, count: 0)
INFO:openpifpaf.decoder.cifcaf:annotations 8: [13, 12, 10, 8, 7, 8, 6, 3]
INFO:openpifpaf.predictor:batch 0: images/peterbourg.jpg
src/openpifpaf/csrc/src/cif_hr.cpp:102: UserInfo: resizing cifhr buffer
src/openpifpaf/csrc/src/occupancy.cpp:53: UserInfo: resizing occupancy buffer
import IPython
IPython.display.Image('images/peterbourg.jpg.predictions.jpeg')
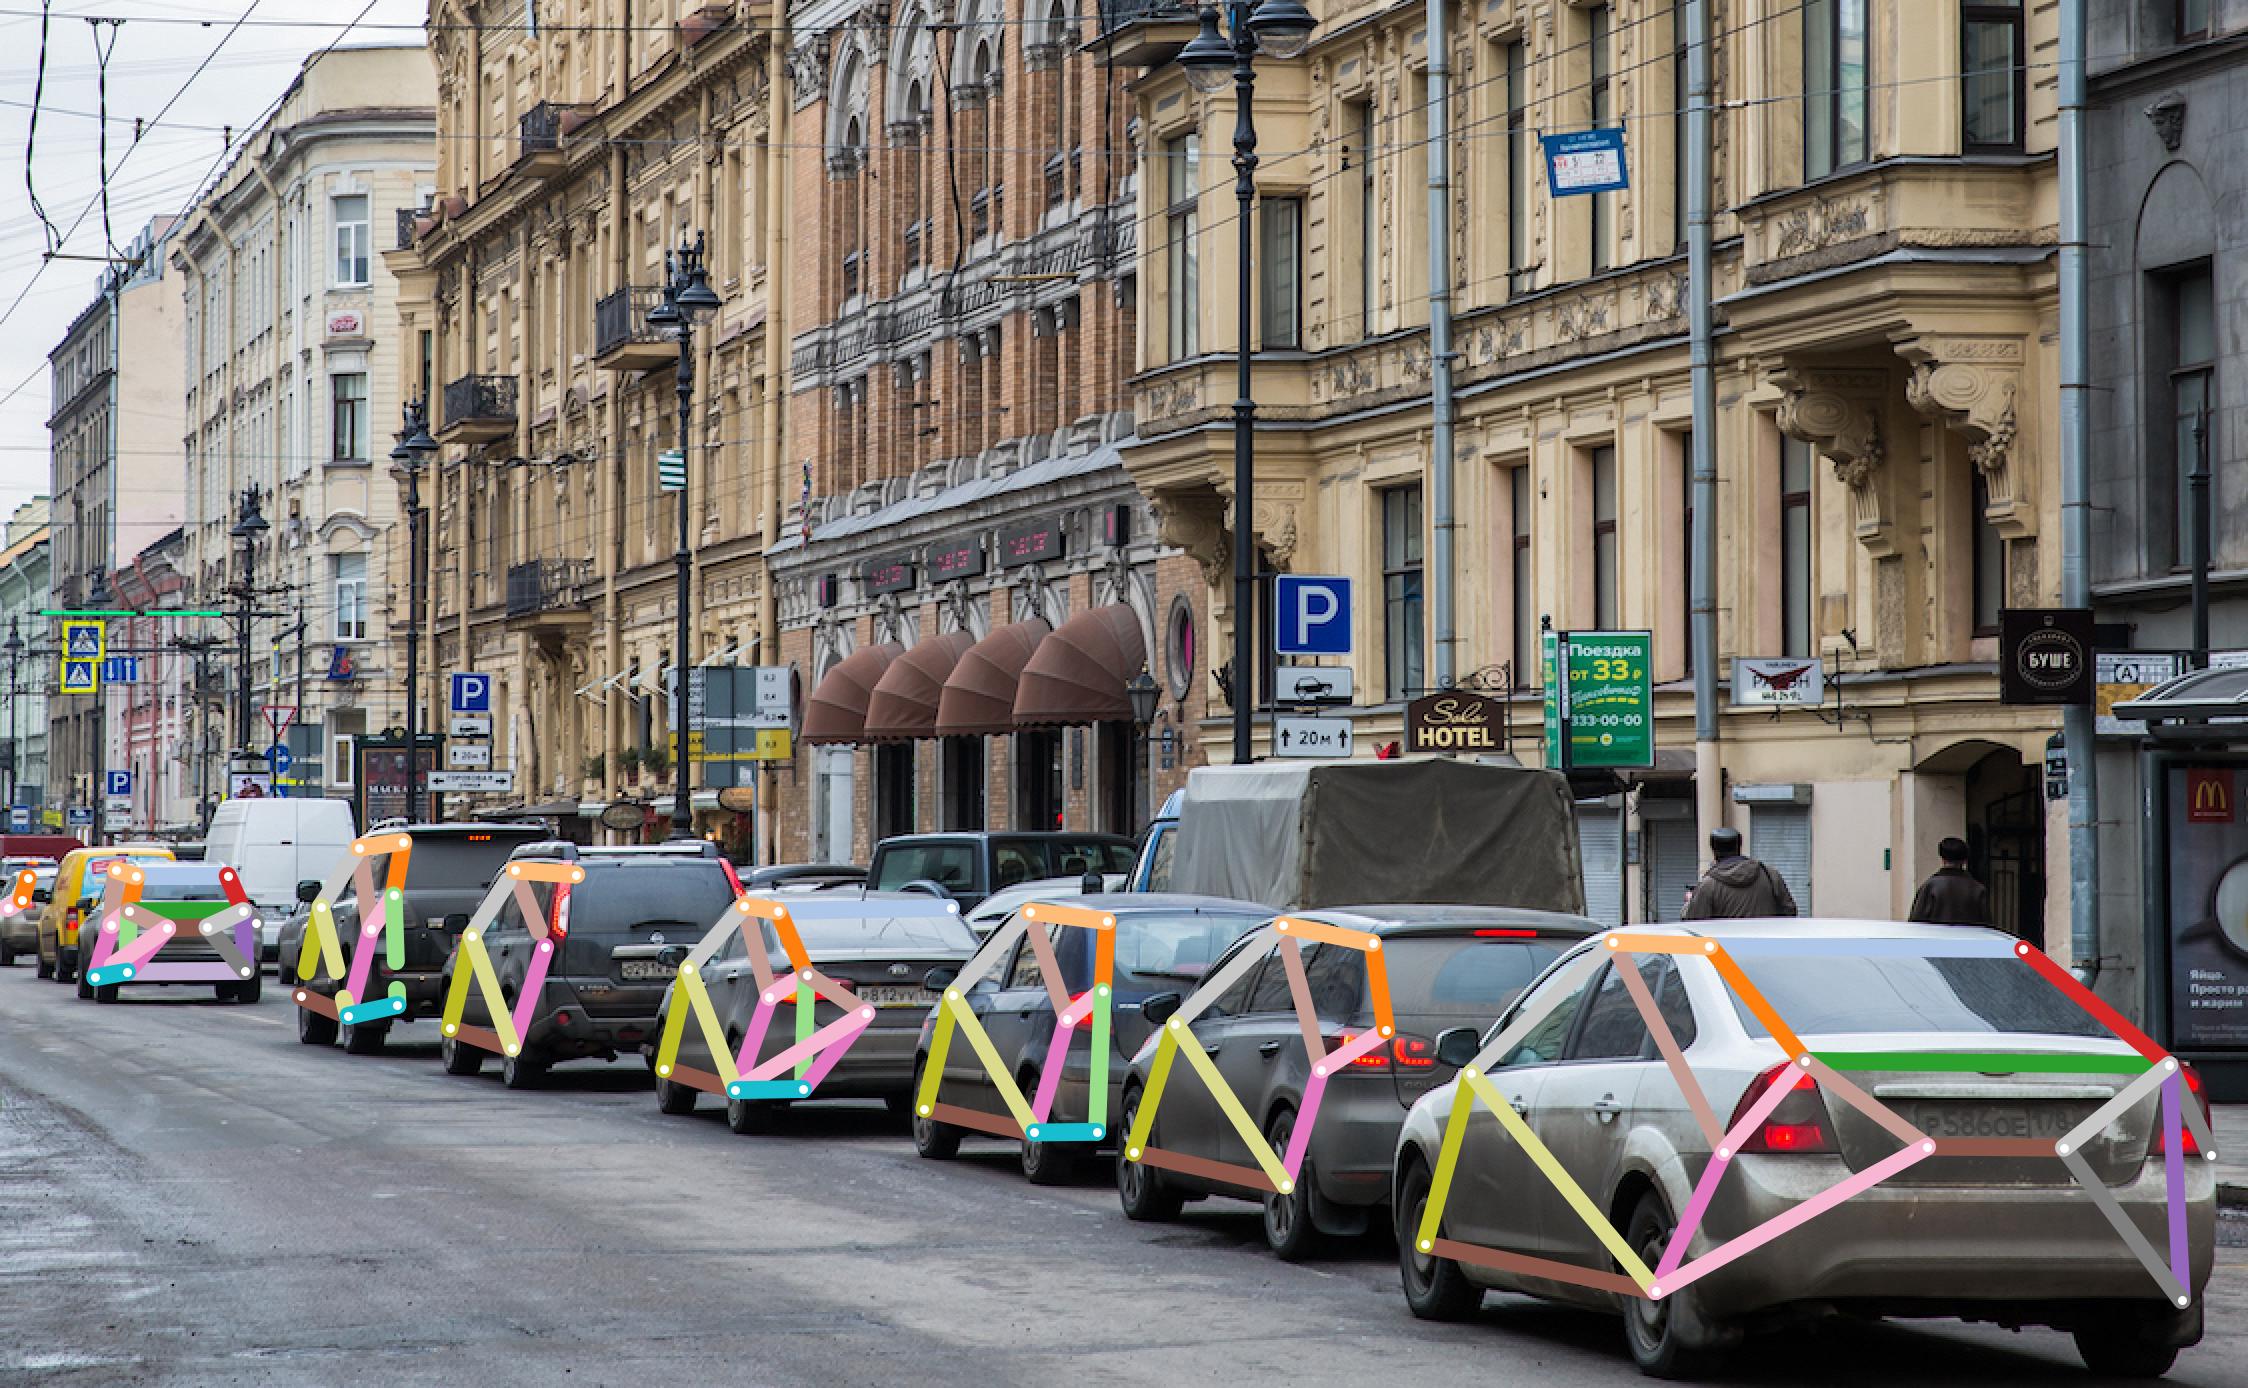
Image credit: Photo by Ninaras which is licensed under CC-BY-SA 4.0.
The car poses with 66 and 24 keypoints can be visualized with:
from openpifpaf.plugins.apollocar3d import constants

with openpifpaf.show.Canvas.blank(dpi=75, nomargin=True) as ax:
    video_66 = constants.plot3d_red(ax, constants.CAR_POSE_66, constants.CAR_SKELETON_66).to_html5_video()
IPython.display.HTML(video_66)
with openpifpaf.show.Canvas.blank(dpi=75, nomargin=True) as ax:
    video_24 = constants.plot3d_red(ax, constants.CAR_POSE_24, constants.CAR_SKELETON_24).to_html5_video()
IPython.display.HTML(video_24)
Preprocess Dataset#
The preprocessing step converts the annotations into the standard COCO format. It creates a version with all 66 keypoints and also creates a sparsified version with 24 keypoints (shown above). To get started, download the challenge train file which contains the train and validation split:
mkdir data-apollocar3d
cd data-apollocar3d
# wget https://ad-apolloscape.cdn.bcebos.com/3d_car_instance_sample.tar.gz
tar -xvf 3d-car-understanding-train.tar.gz
rm 3d-car-understanding-train.tar.gz
cd ..
Then convert to COCO format:
pip install opencv-python
python3 -m openpifpaf.plugins.apollocar3d.apollo_to_coco --split_images
This script will create annotations with 24 keypoints and 66 keypoints simultaneously.
The argument --split_images copies the original images in the new folders according
to the train val split, slowing down the process. No need to use it multiple times.
Train#
The default is training with 66 keypoints:
python3 -m openpifpaf.train --dataset apollo \
--basenet=shufflenetv2k16 --apollo-square-edge=769 \
--lr=0.00002 --momentum=0.95  --b-scale=5.0 \
--epochs=300 --lr-decay 160 260 --lr-decay-epochs=10  --weight-decay=1e-5 \
--weight-decay=1e-5  --val-interval 10 --loader-workers 16 --apollo-upsample 2 \
--apollo-bmin 2 --batch-size 8
python3 -m torch.distributed.launch --nproc_per_node=2 \
  -m openpifpaf.train --ddp \
  --lr=0.0003 --momentum=0.95 --b-scale=10.0 --clip-grad-value=10.0 \
  --epochs=450 --lr-decay 430 440 --lr-decay-epochs=10 \
  --batch-size=8 --loader-workers=16 \
  --weight-decay=1e-5 \
  --dataset=apollo --apollo-upsample=2 --apollo-bmin=2 --apollo-square-edge=769 \
  --checkpoint=shufflenetv2k16 --lr-warm-up-start-epoch=250
For smaller memory GPUs use --square-edge=513.
To train with 24kps, you need to use the --apollo-use-24-kps flag.
Evaluation#
To evaluate the pretrained model, use:
CUDA_VISIBLE_DEVICES=0 python3 -m openpifpaf.eval \
--dataset=apollo --loader-workers=8 \
--checkpoint shufflenetv2k16-apollo-66 \
--force-complete-pose --seed-threshold=0.2 \
--apollo-eval-long-edge=0
To evaluate your own model, provide a path to your checkpoint with
the --checkpoint argument. To evaluate an Apollo checkpoint with 24 keypoints,
provide the --apollo-use-24-kps flag.
Everything else#
All PifPaf options and commands still stand, check them in the other sections of the guide. If you are interested in training your own dataset, read the section on a custom dataset.